That was quite the post last week, I know (Bootstrap AutoCAD Deployments for Customizations Part 5). Now I can take it down a notch or two (grin). I’ll show you how to skip the bootstrap process, and how to give IT what it needs to set up the deployment.
Contents
When and how to prevent the bootstrap from executing
Wondering if you have to run the bootstrap whenever you launch AutoCAD® software? Answer: Not if you start AutoCAD with the correct profile.
Skipping the bootstrap is easy:
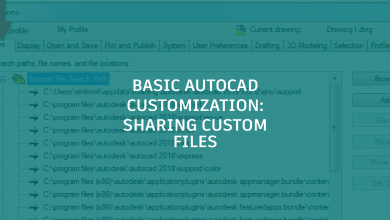
- Place your network customization folders in first position in the AutoCAD search path
- Put your real* autocad.lsp file inside
- Done
* Note: Your “real” acad.lsp file has code to load .net files and configure AutoCAD in specific ways. It is not the acad.lsp that starts the bootstrap process.
The reason this simple process works? AutoCAD executes only the first acad.lsp file it finds. It first searches the open drawing’s location, and then the Support file search path in the order shown in the Options dialog.
Just place your network location before %ProgramFiles%AutodeskAutoCAD 2016Support and your real acad.lsp file will be executed by your desired profile, skipping the bootstrap.
To illustrate: Last week I put the network code in the p:autocadcode folder, and placed it first in the search path. Then I put my real acad.lsp file in that folder. See Figure 1.

Figure 1: Location of the “real” acad.lsp file.
The IT department modifies the deployment
Remember I told you IT needs to modify only one thing when creating the deployment? Here it comes!
- Give IT the bootstrap autocad.lsp file to add to the deployment.
Steps 2 – 7 are for IT.
- Run the deployment wizard and click the drop-down button to open and configure the AutoCAD deployment. See Figure 2.

Figure 2: The AutoCAD deployment wizard. Configure with autocad.lsp.
- Scroll to the Additional Files section.
- Select the Support folder (it’s there by default) and click the Browse… button.
- Add the bootstrap autocad.lsp to the folder. See Figure 3.

Figure 3: Add the bootstrap version of autocad.lsp.
- Close the Configuration section.
- Proceed with the deployment.
That’s all IT needs to do to create a deployment package that lets you control your customizations. That wasn’t so bad, was it?
Wait! We’re not done! Almost! But not quite!
Because we’ve been having such a good time, I’ve decided to append two additional posts concerning AutoCAD-based products, such as AutoCAD Civil 3D and AutoCAD MEP. Many of these products include a Content Browser feature, which is where you’ll support custom catalogs. Intrigued?
See you next week for Bootstrap AutoCAD Deployments for Customizations Part 7!
Here’re all the previous installments:
Bootstrap AutoCAD Deployments for Customizations Part 1
Bootstrap AutoCAD Deployments for Customizations Part 2
Bootstrap AutoCAD Deployments for Customizations Part 3
Bootstrap AutoCAD Deployments for Customizations Part 4
Bootstrap AutoCAD Deployments for Customizations Part 5
Source: Autodesk