The PUBLISH command allows you to create an electronic or paper set of multiple drawings. This streamlined approach is far superior to plotting individual drawings, especially when there are many files to plot.
There are multiple ways to initiate the command, and all but one will display the main Publish dialog, which we’ll later explore in depth. Let’s explore how to publish in AutoCAD.
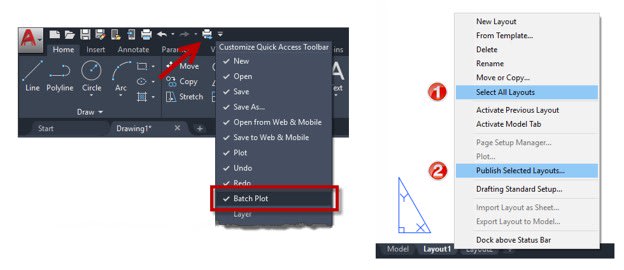
Of course, you can always type PUBLISH in the command line. From the interface, you can find it listed as Batch Plot in the extra commands pull down of the Quick Access Toolbar. Don’t be confused…Batch Plot and Publish mean the same thing, much like the AutoCAD synonyms Plot and Print.
You can also access the command by right clicking on a layout tab. Manually select the tabs you want in advance, or, prior to clicking on Publish Selected Layouts, you can click on Select All Layouts. If you’re someone who has multiple layouts of different sheets in a single DWG, this may become your preferred method.

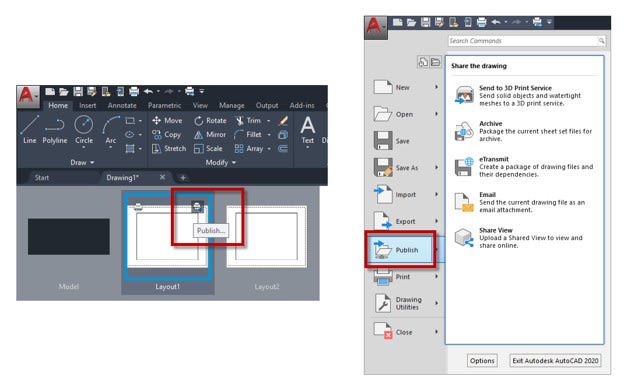
You can also hover over the drawing tab and select Publish from the thumbnail preview. Perhaps you prefer to access the command from the Application Menu. It’s there too.

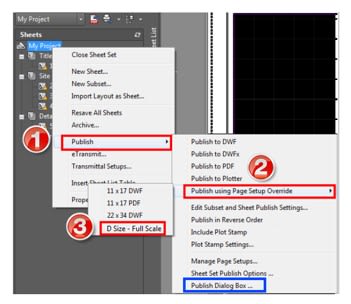
Finally, if you’re a Sheet Set user, you can Publish the entire set, a subset, or any group of selected drawings by right clicking and choosing any of the included electronic types, or you can select from a list of Page Setups that are stored with the Sheet Set Manager. Notice also that there is an option to display the Publish dialog if you desire.
Publishing via Sheet Set Manager is my preferred method, as it is the only one that doesn’t display the Publish dialog, and it is also most likely controlled by a CAD manager at the beginning of the project, ensuring proper standards throughout the set.

The PUBLISH Dialog
This is where the Publish command loses some people, as the default settings in the dialog often create confusion, and operating it is not always intuitive. For these reasons, I see some users avoid publishing, as they simply don’t understand it. Let’s look at two of the defaults that tend to create the most confusion.
The first time the Publish dialog appears, the Sheets list box will be populated with both the Model Space and any Layouts from all drawings that are open. Even unsaved, blank drawings (Drawing 1, etc.). This is because the “Automatically load all open drawings” option is checked. This may not match your workflow, so feel free to uncheck it if you want to work differently.

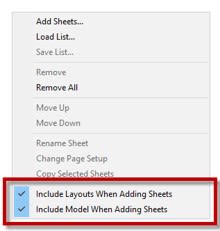
Also, you probably want either Model Space or (most likely) Layouts, but not both. Controlling this is easy, but you need to know how, as it’s not obvious. The secret is to right click within the Sheets list box that contains your sheet names. Doing so will reveal a contextual pop-up menu. Notice that by default, both Model Space and Layouts are checked. Uncheck the one you don’t want.

Now that you have
set Automatically load open drawings, and suppressed Model Space or
Layouts, the dialog will make more sense. But there’s one more step to success.
Those settings (and any others) won’t be remembered until you click on the
Publish button. Don’t make the mistake of closing the dialog to start over thinking
that your preferences are set. You’ll be disappointed.
At this point, I typically publish a temporary PDF or DWF just to let it finish in order to “save” these settings.
In part two of the series, we will take a deeper dive into the Dialog. Stay tuned for more!
Source: Autodesk


