Welcome to the tenth in a series of posts to lead you through the powerful Sheet Set functionality available in AutoCAD. In previous posts, you learned how to select exactly the sheets you want to include in transmittal, archive, or publish sets — whether it’s the entire sheet set, a subset, or individually selected sheets.
As you continue to use Sheet Set functionality, you might want to have different sheet selections, such as plotting the entire sheet set for a design review or creating a transmittal set of just the floor plan and lighting drawings for the lighting vendor. You might also find that you want to access these various selections of sheets many times over the course of the project. So, rather than having to scroll through and select the appropriate sheets each time, the easiest thing to do is to create named sheet selections.
1. Create named sheet selections. You will repeat this process for each named sheet selection you want to create.
- Select several sheets and/or subsets using the Shift or Ctrl keys. These are the sheets that you want to include in the named sheet selection.
- From the Sheet Selections drop-down list, choose Create. If you have multiple sheets selected, you can also right-click and choose Save Sheet Selection.
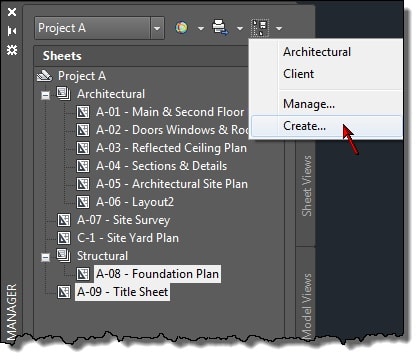
- Enter a name for the sheet selection. Be as specific as possible while also staying concise by using names like Client set, Design review, Architectural sheets, and Landscape sheets.
- Choose OK
2. Restore different named sheet selections
- From the Sheet Selections drop-down list, choose one of your named sheet selections. The sheets that you had selected when you created the named sheet selection are highlighted and ready for you to plot, publish, or eTransmit.
3. Manage named sheet selections
- From the Sheet Selections drop-down list, select Manage
- Choose Rename or Delete
By using these simple steps to create named sheet selections, you can quickly publish, eTransmit, or archive a specific set of sheets without having to go through the sheet list and manually select the appropriate sheet every time.
What’s Next?
There’s plenty more to cover as we dive even deeper into Sheet Set functionality. But, for right now, let’s stop and reflect on what we’ve covered so far. We’ve invited RK McSwain to write the next post and offer some insight on his experience as a CAD Manager using the most fundamental Sheet Set tools.
Remember, you can always catch up on the entire Mastering AutoCAD Sheet Sets series!
Source: Autodesk