In our last installment, we discussed how to create sheet views in AutoCAD. But when you create them, you probably want those sheet views to be labeled, right? Well, that’s just what we’re going to cover here.
Using traditional methods, you might insert a block that uses attributes to display the view number, title, and scale. You can continue inserting your view label block just like you’ve always done, or you can save some steps by assigning your view label block as a property in the sheet set.
1. In the Sheet Set Manager, right-click on the sheet set title and choose Properties.
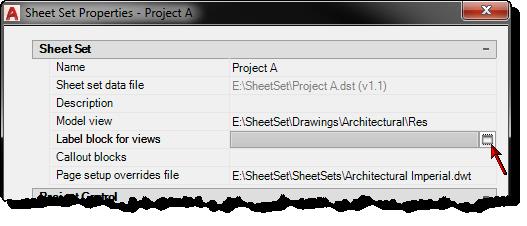
2. In the Sheet Set Properties dialog box, select Label Block for Views, and choose the button to access the Select Block dialog box.
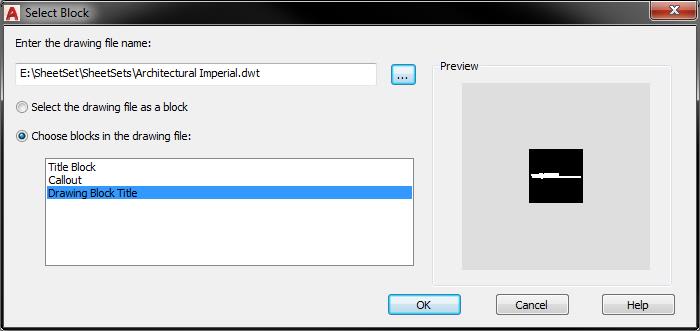
3. In the Select Block dialog box, navigate to file that defines your standard view label block. Your view label block might be defined in its own drawing (DWG) or template (DWT) file or it might exist as a block definition within a larger drawing or template file.
4. If your view label is its own file, select the option: Select the drawing file as a block.
Or
If your view label is a block definition within a drawing or template, select the option: Choose blocks in the drawing file and then select the appropriate block definition. You can only assign one view label block to a sheet set.
5. Choose OK to close both dialog boxes and accept the changes.
Now when you create new sheet views using the Model Views tab, AutoCAD will automatically insert the view label block for you. It places the view label block with its insertion point at the lower left corner of the viewport. You can then use traditional methods to enter the view number, name, and scale.
What’s Next?
We’ll continue with the labeling adventures in the next article and take a look at how to automate view label data. Remember, you can always catch up on the entire Mastering AutoCAD Sheet Sets series!
Source: Autodesk
