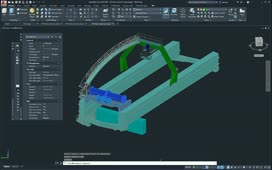
You can create jogged sections so that the section plane cuts through the most interesting portions of a 3D model. You can do this by either drawing the section plane or by adding jogs to an existing section plane.
To draw a jogged section plane, on the Home ribbon, in the Section panel, click the Section Plane tool. In the dynamic input prompt, you can see that the section object type is initially set to plane, and the program is prompting you to select a face or any point to locate the section line. There are also options to draw the section or align it to a standard orthographic view. Right-click and choose the Draw Section option.
The program prompts you to specify the start point. On the Status bar, expand the Object Snap menu and make sure that Center is the only running object snap mode. Then, with object snap tracking enabled, move the cursor over the smaller cylinder until you see the Center AutoSnap marker and tooltip, and then track away along the 0-degree alignment path until the cursor is outside the object, and then click.
The program prompts you to specify the next point. As you move the cursor, you can see a preview of the resulting section plane. Click to select the center of the smaller cylinder.
Now you see the first portion of the section plane and the program prompts you to specify the next point or press ENTER to complete the plane. Move the cursor over the larger cylinder until you see the Center AutoSnap marker and tooltip, and then track away along its 0-degree alignment path. Since you also acquired the center of the smaller cylinder, you can also track from that point along its 270-degree path as well. When you reach the point where the two tracking paths intersect and you see the small white X, click to select that point.
The program repeats the prompt to specify the next point. Track along the 180-degree alignment path until the cursor is outside the object, and then click. Once you have created the three section plane segments, press ENTER to complete the plane.
Now the program prompts you to specify a point in the direction of the section view. Click to pick a point beyond the object in the positive Y-direction. As soon as you do, live sectioning is enabled, the command ends, and you can see the resulting jogged section.
When you select the section object, the ribbon changes to the Section Plane contextual ribbon and you see grips on the section object. You can use the grips to modify the section plane. For example, you could move the location of the plane or modify a jog. You can also change the section object type. For example, on the ribbon, in the Modify panel, expand the Section Type drop-down and choose Volume. Then, click and drag the bottom grip upwards so that it no longer bounds the entire 3D object. Press ESC and then orbit around so that you can see how this affects the section.
Select the section object again and change the section type back to Plane. When you do, the bottom of the 3D object is no longer cut because section plane cutting edges extend infinitely in all directions.
You can also add jogs to an existing section object. On the Section Plane contextual ribbon, in the Modify panel, click the Add Jog tool. The program prompts you to specify a point on the section line to add a jog. Notice that the Nearest object snap is automatically activated. Click to select a point near the center of the larger cylinder. As soon as you do, a jog is added to the section plane.
When adding a jog to an existing section object, you may not be able to position the jog exactly where you want it. Use the ViewCube to change the orientation to a top view and then right-click the ViewCube and switch to a Parallel projection. Then, select the section object again. Now you can use grips to adjust the position of the section plane.
When you are finished, move the cursor over the ViewCube and click Home to return to the home orientation. This also changes the view back to a perspective projection.
With the section object still selected, on the ribbon, click the Live Section tool to toggle off live sectioning. Click it again to toggle live sectioning on again.
You can also toggle the display of cut-away geometry. Right-click to display the shortcut menu and choose Show cut-away geometry. Now the material cut away by the section object has become visible.
Right-click again and choose Live section settings… to open the Section Settings dialog. Here, you can control the various section settings. Scroll down to the bottom. Under Cut-away Geometry, you can see the color, transparency, and other settings that determine the appearance of the cut-away geometry. Click Cancel to close the dialog and then press ESC to deselect the section object.
On the Home ribbon, expand the Section panel. Here, you will find tools for toggling live sectioning, adding jogs, and so on. Remember that you can continue to use the Add Jog tool again to add additional jogs to an existing section object.
Source: Autodesk


